Showing posts with label Beekeeping. Show all posts

Saturday, May 25, 2013

Swarm Chasers

This May, we've had very good luck catching swarms. So far, we've caught and hived four, and we're always looking for more. Whitney joked today maybe we could get a show on cable TV: "Swarm Chasers"!

A beautiful May honey bee swarm in an apple tree
With all this talk about swarms lately, people have been asking us a couple of questions again and again:
1) Why are your bees swarming?
2) How do you catch a swarm anyway?
 
Nice honey bee swarm on pine branch.
1) Swarms are simply honey bee reproduction. Healthy vigorous honey bee colonies with plenty to eat swarm, just like birds hatch eggs, horses foal and elk calve. The difference is of course you don't consider each bee's reproduction, but the reproduction of the colony. In the wild, healthy honey bees would swarm every spring in order to spread their kind. This is why many of the older generations remember finding "honey trees" in the woods. These were swarms from some beekeeper that had gone wild (feral). Today, unfortunately with colony collapse disorder and all the other threats to honey bees, wild honey bees are pretty uncommon.
Swarming is a sign you have robust colonies that wintered with good numbers and plenty of honey to eat.
Catching a swarm
2) catching a swarm is not actually as hard as it may seem - usually. Assuming the swarm is in a nice location (like the picture above) it's pretty simple to hold a hive box under the clump of bees and give the branch a firm knock. The bees will fall into the box and if you got the queen, you can then just leave the box near by and all the bees will file in.  You can then go back in the evening and take the box where ever you want the hive.
God Save the Queen!
Unless you saw the queen, you may not know if you got her. If you did get the queen, all the workers will point towards her and fan. This is how they spread the message of where the queen is, and is a very good sign.
I like to picture them all saying "God save the Queen"!
A more difficult swarm on a W. larch tree
Some swarms are more difficult to catch, like the swarm above. In this case the swarm was on the stem of a larch tree, with lots of branches to contend with. Whitney caught this one while I was out of town. With more than a little patience she was able to hive it by gently lifting the swarm in her hands and setting it in the box.
In the most difficult settings, a customized vacuum can be used to suck the bees out of a tight space and get them into a box. We did this a few years ago  when we found a swarm in our ceiling. Check out: Blog Post: A bee adventure
That's all for now, thanks for stopping by.
KJ
 

Sunday, April 28, 2013

A weed killing - beekeeper’s dilemma.

Are dandelions a wildflower, an exotic weed, or a honey bee forage plant?  What about knapweed, or Canada thistle? Not that long ago, I would have said without hesitation “exotic weeds”! And while most days I still feel that way, I have come to see these plants in a new light.
Early Spring Dandelion

I have been trained as a land manager, and a big part of that is noxious weed control. In my current position, I maintain a herbicide applicators license with our state Department of Agriculture, and administer the noxious weed control program on the state lands within our administrative unit. Roughly 65,000 acres. 
To that end, several times a year I go to training sessions and seminars to learn the latest trends and developments in the weed killing world.  Often this means listening to enthusiastic presentations about the latest and greatest chemicals the industry has to offer.  There are chemicals for everything these days, and if you take everything the vendors say as gospel, chemicals are the answer to all our troubles.

Luckily, there are more than just chemicals in the weed killer’s arsenal. There is also grazing, mowing, bio-controls (weed killing insects) and of course hand pulling. This is what we in the business call Integrated Pest Management (IPM).  As a weed manager IPM is very important, as over reliance on one method or chemical will result in a new generation of super weeds.   
So, we can all agree that noxious weeds are bad and must be dealt with. Or can we?

A beekeeper may see things differently. The first blooms of spring are hugely important to honey bees. This is a time when honey bee colonies are very weak and food sources are scarce. The end of winter / beginning of spring is when honey bees starve.  To a honey bee emerging from the hive on an early spring day and seeing (or sensing) a dandelion in full bloom and ripe with nectar, must be pretty amazing after months of cold weather and no blooms.
Later in the summer after all the native plants have long since quit blooming and bolted, knapweed and thistles continue to thrive. Long into the droughty days of autumn, these exotics provide excellent nectar and pollen that bees use extensively. These plants provide much of the honey we harvest in the fall; in fact many people actually prefer the honey from some very noxious weeds such as knapweed.

So what’s a beekeeping - weed manager to do? For me it’s a tough question, but for now I will continue to fight noxious weeds with every tool I’ve got. The damage to native ecosystems from noxious weeds is tremendous and costly in many ways. Noxious weeds as a rule are poor feed. They out compete native plants and create monocultures. Noxious weeds effectively remove thousands of acres per year from production of livestock and wildlife.  

That being said, if I ever get a chance to place some bee hives near a field with knapweed, I’ll do it!
KJ

Sunday, April 21, 2013

Bees in the City, Part 3: Where to put your bees

I recently had the honor of writing a guest piece on my sister April's blog I [Heart] My Life.

In the first segment Bees in the City, Part 1: Are You Ready for a New Hobby? I wrote about beekeeping as a fun hobby, and share my thoughts keeping bees in the urban environment.

In the second segment Part 2: 4 Steps for Getting Started With Beekeeping I wrote about how a person could get bees and start beekeeping.

This post is written as a third installment:

Part 3: Where to put your bees.

Before you actually take the leap and start beekeeping, take a second and consider you're going to put your bees.

My Langstroth hives
Of course the bees themselves will fly where they want to, but where you put the hives is pretty important. Hives should be placed in a sunny, well ventilated spot, with the hive entrance facing away from the prevailing wind. Sunny locations with good air flow reduce moisture and mold in the hive, keeping the bees dry and closer to their optimal temperature (about 90 degrees F). Facing the entrance away from the wind will help the bees come and go without getting blown off course. Also, if you live in a windy spot like I do, don’t forget to put a weight on the hive lid, or strap them down. I once had a lid blow off in a spring storm, and my bees were subjected to a wet cold night in the open air – Bad News!

 Since I have backyard space, my hives are placed away from the trees, in a spot that gets lots of sun, facing east. My hives sit on stands approximately 6 inches off the ground, to allow air to move under the hive, but not too high to make working the hive difficult.
Full honey bee hives are heavy, and taking a moment to consider that before housing your bees is a very good idea. Langstroth hives consist of one or two deep deep boxes for the bees to live in and several medium or shallow depth “supers” on top for the honey. The term “super” refers to the upper boxes superseding the main hive body. In an established colony, the main hive body will weigh well over a hundred pounds and each super weighs about 40 or more pounds depending on how much honey is in there.
While you hopefully would not be moving the main hive boxes very often, if you are successful in bee keeping and get lots honey, you will be moving the supers.  A healthy colony can fill 3 or more medium depth supers in a season.
For neighborhood beekeepers with limited space, roof top locations can be the answer. The roof top is a generally unused space, with good sunlight and airflow. For many beekeepers rooftops also afford a nice amount of privacy – the only people who know about your bees are the ones you tell. It still seems a bit odd to me, but rooftop beekeeping is becoming common in big cities like San Francisco, Chicago and New York.
Since I don’t have any personal knowledge of rooftop bee keeping, I’ll just mention a few considerations to keep in mind. Access – don’t place your bees in a spot that is hard to get at. Weight – remember bee hives are very heavy and the last thing you need is to crash through the roof with your bees. Heat – bees don’t mind the heat, but working a hive on a blazing rooftop may be pretty uncomfortable.
Finally, one last point on hive placement: In the spring, when the bees leave the hive for the first time months, they have not relieved themselves since the previous winter. For me the first warm 50 degree days of spring are quite a sight with the bees emerging from the hive and cleansing. Cleansing is a beekeeper’s term for pooping.  Yes, the bees fly out and poop. About a quarter of their body mass. That means anything near the hive, especially in front of the hive will get spotted with bright orange bee waste. This is funny at first, until it’s all over your car. Or your neighbor’s car. Or their living room windows. I have actually heard of law suits stemming from this very thing, so it’s worth thinking about before it happens.
Honey bees returning from a spring cleansing flight.
I could go on, but in the interest of keeping things simple I’ll end here. 
I encourage anybody interested in bees and beekeeping to give it a try, but be warned. Beekeeping is fascinating and if your not careful you might get hooked!
KJ

Tuesday, April 16, 2013

Guest Post: Bees in the City

I am very excited to tell you all that accomplished blogger April Johnson Stearns (my big sister) invited me to write a Guest Blog (my first ever) for her blog I [Heart] My Life! This is a huge deal for me since she has a large devoted following and has been featured several times in her area's newspaper: The Santa Cruz Sentinel.
For this piece, I give tips for people interested in beekeeping, especially in the urban environment. Check it out an let me know what you think! Guest Post: Bees in the City
 

Sunday, March 10, 2013

Pollen!

This afternoon I was really excited to see not only lots of bee action from all of our hives, but also lots of bees bringing home pollen. The first pollen of the year! Here are some shots of a little worker heavily loaded with pollen that I took this afternoon.
Forager bees visit flowers and mix the pollen with saliva before placing it into their pollen sacks. Once they return the hive nurse bees unload them and take the pollen into the hive, while the foragers go out for more. In the hive, pollen is mixed with nectar to make brood food.


Seeing bees hauling full pollen sacks, told me both that something out there is blooming and also that the queens will soon be laying eggs for brood. I am very curious what is blooming, and my hunch is it's maple trees or willows. I've been told they are the first bloom in this area. As far as the queens beginning to lay, this tells me that I need to be ready for the populations to grow rapidly and swarm season is coming. Exciting times!
KJ

Sunday, February 17, 2013

Making Lip Balm

Honey bees make honey of course, but they also make other things that are essential to the colony. Along with honey, bees also produce beeswax. Beeswax is a very complex material that makes up the foundation of the hive. It is where the queen lays her eggs, it is where the brood is reared, it is where the food (honey and pollen) is stored and it is where the bees spend the majority of their time. It is on the beeswax that the scout bees do their dance to direct the foragers to ripe flowers, and is said to resonate certain frequencies for communication. The beeswax really is the essence of the bee hive.
Beeswax is also precious. The honey bees must consume about 20 pounds of honey to produce 1 pound of beeswax! That is why a bee colony in it's early years rarely produces much surplus honey, because much of the available honey goes right into wax making.
When a beekeeper harvests honey, he or she must also harvest a certain amount of beeswax. The idea is to leave as much wax as possible for the bees to reuse, but it is unavoidable that some wax must be cut off the frames in order to let the honey flow. The wax that is cut off the frame to free the honey, is called capping wax. This is because when a cell of beeswax (honey comb) is filled with honey, it gets capped with wax. What beekeepers do with the capping wax depends on the beekeeper, but in my mind it is a crime not to put it to good use after all the effort the bees put into making it. Early on, Whitney and I decided we wanted to try making lip balm with our capping wax, so when we extracted honey last fall (Blog Post: The first honey), we saved all of the beeswax.
Our capping wax with the other stuff to make lip balm!
 One weekend this winter, we decided the time was right for lip balm making. Whitney did the research and found the all natural and organic ingredients for our custom lip balm. After cleaning the wax thoroughly we assembled the other ingredients. 
Natural lip balm consists of four main categories of ingredients: 1. Beeswax (top) 2. natural butters (left)  3. carrier oils (right) and 4. essential oils and flavors (bottom). We measured everything out and heated a double boiler to combine the ingredients, since the beeswax must be liquid for mixing. 

Melting beeswax in a double boiler.
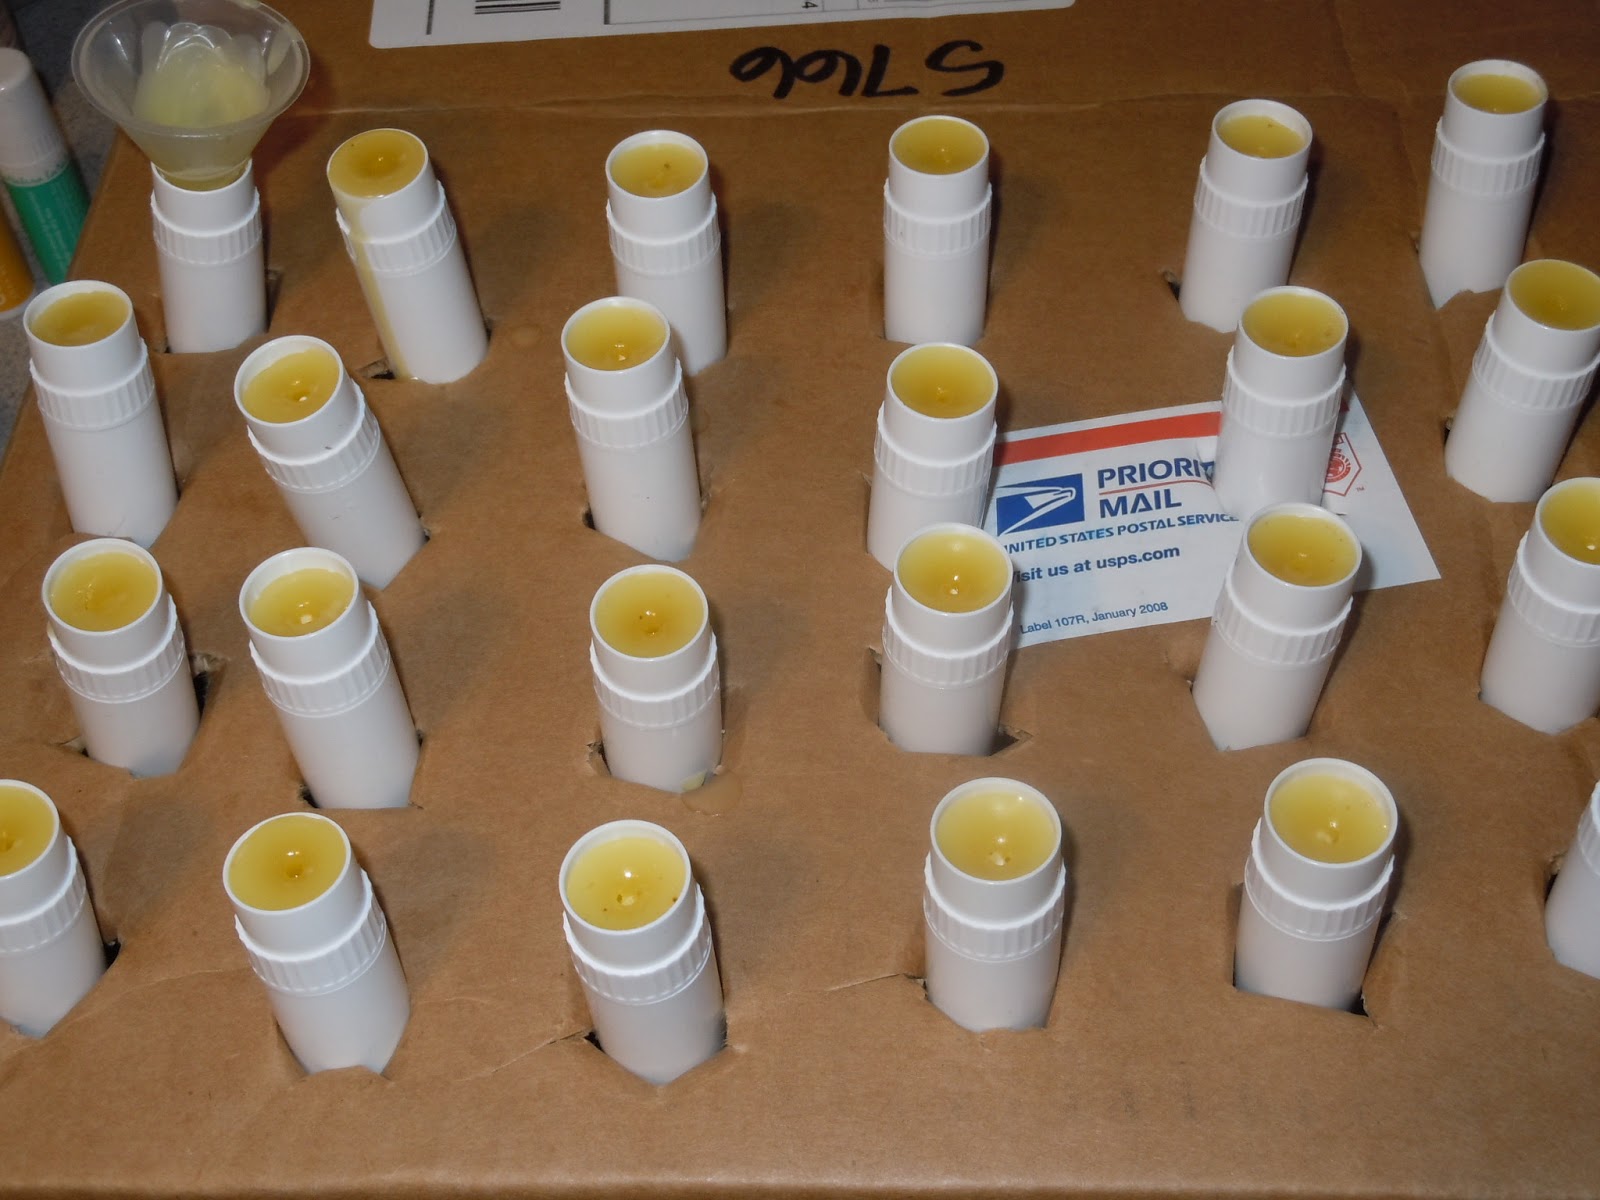
Once the wax is melted and the ingredients well mixed, it's time to fill the tubes. This got a little exciting as neither of us wanted hot wax on our hands, but with a small funnel, and Whitney's good idea of creating a tube holder from a cardboard box, we got it done.

Filled lip balm tubes cooling.
Once the tubes are filled, they must cool for 24 hours. Whit's cardboard box with holes cut in it held the tubes upright while the wax was cooling. Finally, after the lip balms cooled we each took one and used it for several weeks to make sure we liked them and that they worked well.
Let me add here that I am a harsh judge of balms. Since I have very dry skin and work outdoors, my lips and fingers tend to crack and bleed if I don't use balm regularly - especially in the harsh northern winter. I am proud to say that our hand made lip balm passed my tests with flying colors, and did it while smelling great!
Lip Balms with labels on and ready to go!
When we were satisified that the lip balms were just the way we wanted them, it was time to add the labels! These all natural Honey Vanilla lip balms are now available on Whitney's etsy site: 
We've also made a Mint Chocolate lip balm, but it is not yet available, and we may add more varieties in the future.
Thanks for visiting and if you have an idea for a lip balm flavor, feel free to leave us a comment!
Cheers! KJ 

Saturday, January 26, 2013

Winter Candy for the Bees

A couple of weeks ago, I decided to make candy cakes for the bees.
 As you might know, bees are stuck in the hive for the duration of the winter. They spend much of the time huddled in a ball, flexing (shivering) to keep the queen, the brood and themselves warm. To keep warm, the bees need a constant source of food, which is where honey comes in. The reason bees make and store honey is to survive the winter. The only problem is that here I come in the fall and remove a bunch of the honey.
Now, of course I think I left the bees with plenty, a full 9.75" deep box, but I don't really know
So, just to be sure my bees don't starve to death, I feed the bees in the winter. Last winter I fed dry sugar, which works, but is not the best bee feed. So this year I made candy cakes following the simply recipe from www.honeybeesuite.com  

Candy cakes drying on the counter.
 The nice thing about these candies is that they are clean and easy to place in the hive (unlike dry sugar), they are easy to store, and they have a bit of apple cider vinegar to keep them from spoiling (unlike sugar syrup). The other thing about dry sugar is that the bees might mistake it for dirt or other contaminants in the hive, and so will carry it outside and dump it. Bees are tireless house cleaners!
I made these candy cakes a couple weeks ago and placed them on the hives, just in case. Today was warm enough, so I opened the hives to see how our girls are doing and this is what I found.

Bee colony feeding on candy.
The bees seem to be doing well, they are active and smell like clean honey - all good signs. The thing I didn't expect was for them to be eating the candy already. I was thinking that the honey would last them longer into the spring. But that's why I feed, because you never know. We are just getting into the hardest time for the bees. Late winter and early spring is when most colonies die, and is when I lost one last year. Later in the spring, I'll feed candy and protein to jump start the colonies and get them ready for the bloom, but until then, I'll keep feeding the bees candy cakes and hope for the best.
 

KJ

Wednesday, January 16, 2013

Beehives in Napal

One of the many amazing things about honey bees is how adaptable they are. Bees are kept on every continent save Antarctica, in every kind of climate. Beekeepers use many styles of hives, and more are being developed even today. From the ancient skep (coiled hemp rope) to the traditional Langstroph hive (like I use) bees can be kept in anything that provides them a safe, weather tight environment with enough room to store honey and raise brood. You may remember the first bees we captured here were perfectly at home in the eves of our house. In the wild, honey bees live in hollow logs and trees, and even today occasionally you will find a bee tree in the woods. I remember growing up (not so long ago) there was a bee tree on my family's property for years and years. As kids, we thought racing past the tree was pretty exciting but I don't think the bees gave us a second thought.
Recently a friend of my family shared these pictures with me of bee hives he saw while visiting Nepal.
The thing I thought was so neat about this was how the locals had adapted items they had on hand to house bees. I found it inspiring that without milled hive boxes and specially manufactured parts they were (apparently) successfully keeping bees. In the end maybe all a beekeeper needs is healthy determination and good old fashioned innovation.
Thanks to Paul Green for the photos.

By the way, this is our 100th post! Thanks for all the support, this blog never would have made it this far without you. Cheers!
KJ

Monday, January 7, 2013

What happened to my honey?

One day craving honey, you open the cupboard and reach for your jar of honey but in it's place is a jar filled with a cloudy solid mass. What happened?
Your honey crystallized, but don't worry. Putting your honey back into liquid is super easy.
Actually, you should take it as a good sign. It proves that you have raw unfiltered honey the way it ought to be. If your honey does not crystallize, it means that it's been ultra-filtered and pasteurized as is the case with much of the mass-marketed honey in the grocery stores. Take a look at the honey next time you're in a supermarket. Chances are it's so clear, it's like looking through yellowed glass. That's the product of ultra filtering under high pressure. This process removes all the ultra fine particles of pollen, propalis and minerals from the honey.  The downside is that all those particles are part of what makes honey so good for you. Then to make the honey easier to handle and to make certain it does not granulate or crystallize, the honey is heated. Honey that is heated over 145 degrees for 30 minutes will not crystallize, but it's pasteurized (read: DEAD). All the living enzymes and beneficial bacteria are killed. So, when you remove all the pollen, propalis, minerals, enzymes and beneficial bacteria that give the honey it's healthy attributes, you reduce the honey to simple sugars. It's nothing more than fructose, glucose, sucrose, water and a handful of other minor components. Honey flavored water essentially. So it that light, what's the point? Make sure your honey is pure and raw or you're getting duked.
Now, the actual time it takes honey to crystallize depends on the variety of flower that the honey bee collected the nectar from. Honey from some flowers will crystallize in a few short days while others take nearly a year. That's because it has to do with the ratio of fructose to glucose is in the actual nectar of the flower, since only the glucose forms crystals.

Warming honey on the wood stove

If you happen to have honey that's crystallized already, what do you do? Just warm it gently and let it turn back into liquid. I did this recently on our wood stove. All you need is a large pot with some water in it. Into the water you place your jars and heat the water to about 100 degrees. Let it set for a while and just like that your honey will be restored to it's nice liquid state.
So, if your honey has crystallized don't worry. And if you've had the same jar of honey for years and it's never crystallized, now you know why. In either case, use it and enjoy it. Appreciate it and never forget the effort that went into that jar of honey. After all, tens of thousands of honey bees literally worked themselves to death making that honey.
Thanks for reading.
KJ
Most of the technical information in this post came from the Beekeeper's Handbook by: Diana Sammataro and Alphonse Avitabile.

Thursday, November 29, 2012

Keeping the Bees Warm and Dry

This fall I had been reading about Moisture Quilts on Honeybeesuite.com and liked the idea but wanted to make a few changes. The idea is to provide insulation and ventilation to the bees and also absorb the moisture that is produced by the bee cluster. I think one of my colonies died last year due to lack of ventilation, as the moisture condensed and dripped down on the cluster.  Also, in addition to providing ventilation, insulation and moisture control, I wanted to build in a space for feeding the bees, not included in the original moisture quilt. Usually the top covers of the hive fit down close to the top of the honeycomb frames, leaving only enough room for a bee to walk across the top of the frames. This is about 3/8 of an inch and is referred to as "bee space". In the summer, if there is anymore than bee space between anything in the hive, the bees fill it with comb. So as a result there is no room to feed unless you add an empty box for that purpose. Lastly, I wanted to use wire screen to hold the wood shavings insulation, rather than burlap like they used originally.
So, one day this fall I set out to build some boxes that would meet these needs, this is what I came up with.

Construction Phase 1
First off, I cut some pine 1x6's to length and drilled 3/4" holes in two sides for vents. Next I glued and nailed the boards together to make three boxes. Then I cut 1/4" wire screen to fit inside the boxes and stapled it in place. I positioned the screen in each box so that it was about three inches down from the top, and also made sure the folded edges of the screen covered the holes just to make sure no unwanted hive guests moved in. Finally I painted the boxes and left them to dry.
Construction Phase 2

The next day, I placed the boxes on the hives. Things were looking good. The portion of the box above the screen would hold pine shavings for insulation and moisture control, the portion below the screen would be for feeding, and the holes would provide the venting. I started to load up the first box with pine shavings, but soon saw that fine pieces of the shavings were going to filter down onto the bees. I guess 1/4" screen was a little too coarse. I didn't like that, so I cut a couple old T shirts in to sheets and placed the cotton sheets on top of the wire. This should allow the moisture to travel up to the top of the hive and condense and then drip down on to the shavings, and not the bees.

Modified Moisture Quilt in place.
Here is the modified moisture quilt in place. When I last checked the bees, all three colonies were looking good. They had plenty of honey to eat and were clustered nicely. As we head into December, I'll check them again and see if I need to feed to help them through the hard times. As spring approaches, I'll feed protein to help the colony get a jump on the brood rearing and building up the population for the bloom.   Speaking of honey, how is your honey store? We still have a few jars left of our Johnson's Garden Honey available. They make great gifts for anyone interested in local, homegrown goods and health foods. Shoot me a note at KyleJohnsonMontana@hotmail.com or comment on this post if your interested. Remember, honey is non-perishable and easily shipped!
That's all for now, thanks for reading.
KJ

Wednesday, October 10, 2012

Our first honey tasting

This Columbus Day weekend Whitney and I had the pleasure of taking part in the 13th Annual, Apple Cider Making Party at the GHJ Tree Farm! It was a beautiful day on the farm in the Santa Cruz Mountains of California where I grew up, and a wonderful time to catch up with family and old friends. It was Whitney's first Cider Making Party, and my first in many years, so it was a truly special day. Look for a blog post all about Cider Pressing coming soon.

While there we had our first (unofficial) honey tasting. One of the reasons I have always been pro honey bee is my good memories of having bee hives and honey when I was young. Years ago my Dad used to sell comb honey at his road side stand along with apples in the fall and Christmas trees in the winter. In more recent times, the bees were maintained for pollination, but not honey. Eventually with the onset of Colony Collapse Disorder and other pests and diseases, the bee hives went away.

Around the same time that Whitney and I became interested in bee keeping, my Dad also decided to return to bee keeping and purchased a package of bees. His first attempt didn't survive, but since then he has been successful, and this year for the first time in many years he harvested honey!

Our honey on the right and my Dad's GHJ Tree Farm honey on the left.
One amazing thing about honey is the variation that can occur between hives. Color, taste and aroma (as well as length of time to crystallize) all depend directly on what plants the bees were feeding on when they filled the comb. Honey truly is a local crop, meaning that what is in the jar is a true representation of what is available within 3 miles of the hive (and often closer when flowers are plentiful). Like ours, my Dad's honey supers were pulled off the hive in the Autumn, so it is a summer honey, as opposed to a spring honey some people extract. Due to our location, our honey is likely a mix of wildflowers, flower gardens and vegetable gardens. It has a full rich flavor, that may come as a surprise at first but is very enjoyable. The GHJ tree farm honey, I suspect has much more wildflowers (weeds) and tree pollens in it due to the remote location. To me this dark amber honey had a light crisp flavor that instantly reminded my of Dad's honey of my youth. To mix things up further, we added a craft third honey, from Snyders Honey in La Honda, CA.

The two Johnson honeys on the right and Snyders Honey on the left.

Again, the light color had no impact on the flavor, which to me was mild and very pleasant, but taste is subjective so one person's sweet is another's mild.
What I do find interesting is that Americans seem to prefer lighter colored honey, so when the big honey houses bottle their batches, they mix it all together and shoot for a nice light to extra light amber like the Snyders Honey above, which is why that's what we are accustomed to seeing in the stores.
Honey colors are expressed in terms of mm according to the Pfund scale, so an Amber like ours has a range of 86 - 114mm, while a Dark Amber like my Dad's is >114mm and an Extra Light Amber like the one of the left is 30 - 50mm. In order to grade honeycolor , one uses a specially tinted piece of glass that has the scale printed on it from light to dark. Source:http://www.honeybeesuite.com/the-color-of-honey/. Does this matter to the honey taster? Nope not a bit, I just find it interesting.
In any case, our first Honey Tasting was a lot of fun, made even more so since we could visit with family while enjoying! Take care everybody, and thanks for reading. KJ

Friday, September 21, 2012

The First Honey

 If you remember A bee adventure, then you'll know this day was a long time coming. Over a year ago we decided to give beekeeping a try, after honey bees colonized our porch eaves. In the months since I've posted about the ups and down of learning the trade. Now for the first time, I would dare to call myself a Beekeeper. Last weekend Whitney and I extracted honey for the first time, I guess you can tell I was pretty excited!
A frame of capped honey comb
Honey bees are unique in that they will keep packing away food stores far beyond what they need for survival. A smart beekeeper always makes certain that the bees have enough for themselves, then harvests the extra. Above you see a frame of capped honey ready for extracting. Bees cap the stored honey in the fall and then when it's needed, they chew the capping wax off for the colony to eat.  
Cutting off the capping wax
Before you can spin the honey out of the comb, you must cut off the capping wax to free up the honey in the comb. This wax will get melted and cleaned and Whit plans to try her hand at making lip balm this winter. Stay tuned for that!

frames ready to spin
 The uncapped frames are loaded into the extractor and spun. The spinning forces the honey out of the comb and onto the sides of the exctractor. The honey runs down the inside and pools in the bottom of the extractor.
the very first drop of honey
Eventually the honey pools enough and drops into the filter cloth. This was an exciting moment! Many long  months of reading, researching, hoping and planning, all came down to this. The very very first drop of honey. (que clinking glasses!)

Success at last!
After being filtered, the pure raw honey is poured into jars and capped. There is no heating so the honey remains totally pure and natual and will store indefinately as long as it's kept clean. This first jar was a huge acheivement, I can't even describe how proud I was and still am. Since pure raw honey is actually alive (non-pasturized) it's health atributes are unmatched, but should never be fed to young kids. The color of the honey can vary greatly and is attributed to what flowers the bees were visiting. Since we don't know where every bees went, we'll call ours "garden honey".
After the first jar, the honey kept flowing and we were able to store plenty for ourselves and will have some to sell and give as gifts. All in all this was a huge day for me. All the work and preperation finally paid off. Not unlike my first successful deer hunt, and that first taste of fresh tenderloin. Pure joy and achievement.
Now already I am planning and researching how to over winter my bees so that next spring they are even more healthy, happy and productive!
Thanks for stopping by. KJ

Sunday, June 10, 2012

one weekend, two swarms

This weekend, two of our hives swarmed. I walked out of the house on saturday morning and instantly heard them. Walking over by the hives there were bees everywere. Hives swarm for several reasons, but it usually comes down to either the bees are healthy and reproducing, or they are leaving to find a new location. The good news for us is that these swarms belong to the first group. I know that because while the swarms were forming, the parent hive continued on with business.  In the picture below, you can see the two swarms: one in front of me and one on the far left (below the farthest hive). Beekeepers try to reduce swarming because it means a loss of population and a reduction in potential pollination and honey. But on the other hand, if your hives are healthy enough to swarm, then you are doing something right and the bees are doing what they naturally want to do: Reproduce! So I take it as a good sign. In the book Natual Beekeeping, the author Ross Conrad refers to swarming as "the miracle of life" since it really is bee reproduction.  
 So, now what to do about this rampant reproduction. My first idea was to simply place hive boxes near the swarms and allow them to hive themselves. This is a technique that some swear by, so I thought I'd give it a try. But after leaving them there for several hours, the bees had yet to move into the boxes so I decided to catch them manually.
Here is a good look at one of the swarms. The bees leave the colony and ball around the queen. While they are in the ball, scouts are out searching for a new home. The scouts could return at any time and communicate to the swarm it was time to leave, so I decided to hive them before they had a chance to leave. I have read that bees will remain balled for as little as fifteen minutes, and these had already been here for several hours.
When you are hiving a swarm, you physically take the swarm and place them into the hive. The sensation of picking up the bees is pretty amazing, they feel like a warm spongy mass of about a couple of pounds. The most important thing is to make sure you get the queen. Here (above) on my finger tips you can see the queen of one of the swarms. Once the queen is secure in the new hive, all the workers follow her right in, guided by her pheromones.

Here is a swarm placed into the new hive. This is the deep box that I had prepared in case I got a chance to catch a swarm this summer. The other swarm got placed into a super ( or medium box) because I don't have any other deep boxes on hand. This will work just fine, but will require more equipment because I'll have to give them two supers to equal one deep box.
So here we are this evening. I successfully captured both swarms, upping our count to five colonies! I'm glad that I didn't lose any of my bees, but I need to get better at anticipating and preventing swarming. In the mean time I need to get to work building frames so that all these bees have somewhere to store their honey! More on that later.
KJ 

Monday, May 28, 2012

Supering up for Honey

Happy Memorial Day!
I had hoped to celebrate the holiday with a ride in our 1943 WWII jeep, but I ran into some trouble replacing a wheel bearing, so that had to wait. I did manage to plant a couple of trees on the place and do a little beekeeping.

The first two colonies looked like this above. These are the ones I got earlier this spring: http://www.kyleandwhitneymt.blogspot.com/2012/04/bringing-home-bees.html
They are expanding nicely and working hard to build honeycomb in the upper deep box. This is the honey they will need to survive the coming winter. Things got more exciting when I lifted the lid on hive number three.

The picture doesn't show it well, but this is the top of the upper deep box, bursting with bee activity. By the way, this is the colony that we vacuumed out of the ceiling last year: http://www.kyleandwhitneymt.blogspot.com/2011/07/bee-adventure.html
This hive is well ahead of the other two and is nearly done packing honey into this box. This is really exciting because it means the bees have finished gathering the honey they will need for next winter and are ready to start filling supers for us! I wanted to show off some pictures of honeycomb capped and beautiful, but the camera had a dead battery, so that will have to wait. For now take a look at the picture at the top of this post. The smaller white box on top of the other two is the super. It's called that because it supersedes the brood chamber. This is where the extra honey will be stored, and what we will extract this fall. Honeybees are unique in that as long as there are flowers to visit and room for to store honey, they will keep right on packing it in. From now until this fall, these little beauties will be hard at work storing honey for us. When this super is full, I'll add more. Now that's exciting. In the mean time I have to get to work preparing more supers, so that I'm ready for the honey flow. With luck each hive will end the season with two or three supers. Sweet!
 KJ 

Thursday, April 26, 2012

Spring is Go Time!

1...2...3...Go!


Lately around here it feels like somebody waved a green flag and we're off and running. Between the additional bees, the 5 new chicks, the veggie starts in the greenhouse, Whit's crafts, and the rest of the yard work, it's go time. We hit 85 degrees last weekend and just like that the spring came alive, the grass is growing, the trees are blooming, and the Asparagus is growing inches per day! 
First up the bees: in the last post I told you that I went to WA and brought home two five frame nuc hives. Since then the bees have really taken off! The fruit trees are blooming and the dandelions are up. All of a sudden the world is custom made for honey bees. They arrived with lots of brood, which means they were ready to hatch a new generation of workers. Within days of the installation the population exploded. I checked them tonight and they have just about filled the first box with honey and are nearly ready for box number two. Our original hive is doing great too, and is in nearly the same shape as the new ones. We've been cleaning up, disinfecting and repainting used boxes to get them ready for the upcoming season. One of the new hives was even building swarm cells, meaning they are intending to raise new queens and reproduce. That is a sign they are in high gear and I need to be very actively watching them and ready to stack up boxes to keep them busy.
Next up, the new chicks! Whit brought home five newly hatched Silver Laced Wyandottes from the feed store today! The little peepers are all healthy and doing good in the brood box. These little ones will brood for a month in the house, be moved to their own living quarters in 6 weeks and then join the flock later this summer. By late fall or early winter they should be fully integrated into the flock and laying. Until then it's a lot of fun having chicks again and the dogs are very curious about the noisy box on the hearth. They have to be kept seperate from the other hens while they are young, soon I'll fix up a dog kennel for them, and build a small chicken tractor so they can get out in the grass. The rest of the hens are doing very well and really happy about all the green grass and bugs in the yard.
Next: Veggie starts! This year we are very lucky in that one of our friends is working at a greenhouse starting plants. She's been bringing us starts that are left over after they re-pot so we have a very nice assortment of veggies in the greenhouse. I'm proud to see the greenhouse working so nicely and will definitely post some pictures when I get a chance. This weekend, one of our pressing to do's is prepping the garden beds that will hold the lettuce, broccoli, spinach, beets, carrots, onions, peas and potatoes.  Already we've had several friends asking if they can buy our produce this summer! We're pretty excited, but it's going to be a lot of work.
Finally the crafts. Whit's earrings and hair clips have been such a success, she's decided to sign up for a locally made craft fair in Missoula. Now she's working hard to build up her inventory so that we can take pictures and provide them to the fair in her application (it is a juried show). That event will be in late June and she is hoping she gets chosen. 
I know it was brief, but that's what we've been up to. Spring is both a very exciting and overwhelming time of year. There is so much to do, but it's all fun and great to see our little farm taking off.
Hope you are all doing well, and I'll try to post more pictures real soon.
KJ

Monday, April 16, 2012

Bringing Home the Bees

After losing our smaller hive in February, we decided to go ahead and order some bees. They were sold out, but I got on the waiting list and we got a call last week saying there would be bees available.  Saturday I drove over to Washington and picked up our new girls.  The nucs come in cardboard boxes with a brand new queen, five frames of brood, and many, many worker bees.
The drive went well, aside from the dozen or so girls that got loose and buzzed around inside the car while I drove home.
Our first introduction to the new girls, pretty exciting, and loud!
And here is one of our new queens! This little beauty is bred to lay 2000+ eggs a day and has been chosen for her superior traits and quality. She determines the genetics of the whole hive, so it's important that she is  the best queen she can be. The new queens come housed in a cage, with a bit of tape over the candy plug. When the bees are installed, the tape is pulled off exposing the candy and allowing the workers to release the queen. By that time the workers will have accepted the queen and will be ready to go to work.

This is what makes the nuc so special. There are five frames of brood like this ready to hatch and go to work right away. With a swarm or package of bees you have to wait for the queen to lay eggs, and for the brood to mature before you get any new bees. That time lag sets the nuc ahead by a month.
And here is an installed nuc! The five frames are full, and the queen is secure in her cage in between the frames. All that's left is to feed them a gallon of syrup each and then leave them alone for a week to release the queen and get to work. In a few weeks they will have filled the rest of these frames and will be ready for a second box to be added.
So here's our "bee yard" today. The original hive on the left, with the two new ones on the right. By the way, the original hive, the one that was vacuumed out of the eaves last summer, is still going strong and appears to be happy and healthy. The yard has a audible hum now and the bee activity is very noticeable. Just in time too, since today I noticed the dandelions are blooming! Ordinarily this may not have been that exciting but now I just imagine how happy the flowers will make my bees.
Our other big news: we were very lucky and have recently been given unwanted bee boxes and equipment from two different people. So the next adventure is cleaning and prepping hand-me-down boxes and frames so that we are ready for the nectar flow. Bring it on! 
Until next time. KJ